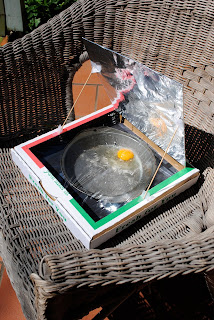
Thought I would test a pancake this morning also in my other oven using some leftover waffle mixture i have in my fridge. I will definitely not be trying this one if it works as I made the waffle mix last tuesday.. But worth a test! Chucked it in at 10am.
15 mins in - No change to pancake mix but oven is heating up.
30 mins in - Pancake is starting to cook in small areas. Moved the oven to better sun.
1 hour in - Pancake is slightly more cooked but still looking pretty damn feral. I think I should try it again but with proper nice fresh batter instead of gross week-old batter.
1 1/2 hours in - I have given up on the pancake as it is super feral and I have to go to uni.
Turns out that the lighter part that I thought was cooked was in fact squishy and gross when I poked it and the darker batter was more cooked and firm. There was also a fair bit of water in the pan from dripping condensation on the plastic. For the future I maybe need to wipe this off along the way??
I think I will try this again on the weekend with proper batter.
Friday, September 17, 2010
tea for 3
Now that I have my new hardcore solar oven I am super keen to use it! So I have set up 3 cups of tea (one for me, one for my sister and one for my brother) in my oven. Very glad the two of them are around the house this morning and willing to sample my solar tea. At 10am I filled up each mug with cold water and stuck the tea in. In my black mug I have a herbal strawberry teabag, in my sisters blue mug I have some T2 leaves in a strainer and in my brothers stripey mug i have a back russian caravan teabag.
15 mins in - Oven is heating up nicely.
30 mins in - The tea is feeling luke warm. I have agitated the teabags/strainer to help infuse the flavour. I moved the oven to better sun.
My brother, sister and I sat down to try our varying teas..
Neither my brother nor my sister were particularly impressed with their tea (this was partly me fault - the tea was not hot enough. As a non tea drinker I thought it was ok and I think I was a bit too excited). However I thought mine tasted ok and they both agreed after tasting it. From this we have concluded that perhaps herbal tea bags are most suited to the solar oven over the black teabags and loose leaf herbal tea. I think I will test this theory again over the weekend to see if it holds.
They also suggested that perhaps the strange taste came from the fact that the tea bags had been soaking in the water the entire time. So perhaps I will also test a mug without the tea bag and add it in once the water is hot enough as one normally would when making tea.
15 mins in - Oven is heating up nicely.
30 mins in - The tea is feeling luke warm. I have agitated the teabags/strainer to help infuse the flavour. I moved the oven to better sun.
You can also see here the pancake i have cooking simultaneously in my other oven. Blog post is to follow.
1 hour in - Tea is ready!!
My brother, sister and I sat down to try our varying teas..
Neither my brother nor my sister were particularly impressed with their tea (this was partly me fault - the tea was not hot enough. As a non tea drinker I thought it was ok and I think I was a bit too excited). However I thought mine tasted ok and they both agreed after tasting it. From this we have concluded that perhaps herbal tea bags are most suited to the solar oven over the black teabags and loose leaf herbal tea. I think I will test this theory again over the weekend to see if it holds.
They also suggested that perhaps the strange taste came from the fact that the tea bags had been soaking in the water the entire time. So perhaps I will also test a mug without the tea bag and add it in once the water is hot enough as one normally would when making tea.
a new, bigger, crazier oven!
What you'll need:
- a bunch of large cardboard boxes (I got mine from dymocks)
- aluminium foil
- glad wrap
- scissors
- stanley knife & cutting board & metal ruler
- non toxic glue and tape
- heavy duty masking tape
- black construction paper
- double sided tape
- newspaper
What to do:
Tape together the bottom of your box (if it is not already sealed) with the heavy duty masking tape.
Draw around the bottom of your box onto another piece of cardboard. This is to create an even bottom surface for the box.
Cut out using your stanley knife, a centimetre or two inside the lines you have drawn.
Place the piece securely in the bottom of you box. You may need to make a few adjustments to get it to fit (I did).
Be wary of curious kittens who like to eat cardboard. They may attack your box. Mine did (multiple times).
Place black construction paper on the bottom of your box leaving a border. I used an A3 size piece which was perfectly sized for my box.
Cut 4 pieces of cardboard to fit snugly around the black construction paper, forming a smaller box. If you happen to have a smaller box that fits in perfectly then you can save yourself a bit of time.
Cover the insides of your smaller box with aluminium foil. I stuck the pieces of cardboard together will double sided tape so they will stay snugly in place.
Stuff the gaps between the two boxes with crumpled newspaper.
Cut another large piece of cardboard to form your reflective shield. Cover it in aluminium foil and then tape it to the remaining horizontal flap using the masking tape.
And then i chucked in a scrap piece of cardboard to use a prop for the shield so it stays up.
And that is how this oven is made!
Credit to eHow.com for this link which gave me the base idea for this box : http://www.ehow.com/how_2083_make-solar-oven.html
- a bunch of large cardboard boxes (I got mine from dymocks)
- aluminium foil
- glad wrap
- scissors
- stanley knife & cutting board & metal ruler
- non toxic glue and tape
- heavy duty masking tape
- black construction paper
- double sided tape
- newspaper
What to do:
Tape together the bottom of your box (if it is not already sealed) with the heavy duty masking tape.
Draw around the bottom of your box onto another piece of cardboard. This is to create an even bottom surface for the box.
Cut out using your stanley knife, a centimetre or two inside the lines you have drawn.
Place the piece securely in the bottom of you box. You may need to make a few adjustments to get it to fit (I did).
Be wary of curious kittens who like to eat cardboard. They may attack your box. Mine did (multiple times).
Place black construction paper on the bottom of your box leaving a border. I used an A3 size piece which was perfectly sized for my box.
Cut 4 pieces of cardboard to fit snugly around the black construction paper, forming a smaller box. If you happen to have a smaller box that fits in perfectly then you can save yourself a bit of time.
Cover the insides of your smaller box with aluminium foil. I stuck the pieces of cardboard together will double sided tape so they will stay snugly in place.
Stuff the gaps between the two boxes with crumpled newspaper.
This next bit - making your plastic cover - is kind of tricky. I had to improvise a fair bit here. I think what i have devised is pretty good but I wonder if there would be a better solution, I do worry that a bit of heat can escape.. I joined two pieces of cardboard with glad wrap (I cut off 1 of the side flaps on the box and then cut it in half). These two bits slot in at either end of the inside box (vertically). It is a little bit hard to see but the second picture shows it better. I then made another one of these (also using a side flap) to fit horizontally across the box to help hold the first layer down tight. So basically, these things can be pulled out and roller around eachother when putting food in the box/taking it out and also when the box is not in use. Hopefully further photos of the box in action will better demonstrate what i have done.
Cut another large piece of cardboard to form your reflective shield. Cover it in aluminium foil and then tape it to the remaining horizontal flap using the masking tape.
And then i chucked in a scrap piece of cardboard to use a prop for the shield so it stays up.
And that is how this oven is made!
Credit to eHow.com for this link which gave me the base idea for this box : http://www.ehow.com/how_2083_make-solar-oven.html
Tuesday, September 14, 2010
why is the weather so crap?
You may have noticed I haven't been doing any cooking for the last few days.. This is because I have been at the snow since Thursday. I was looking forward to getting back and conducting some experiments as the weather had been awesome, but it seems it has turned just to spite me. I really hope this rain doesn't continue to piss down on my parade and the sun is back asap!!
Wednesday, September 8, 2010
this weather is so frustrating!
WHY IS IT SO COLD?!
I am not confident that anything will be able to cook in these conditions. The sun is out there but you certainly cannot feel it!! Really hoping this cold spot goes away and SOON.
This afternoon I am going to try and get my larger oven done so it will be ready to cook with, if the weather improves..
Monday, September 6, 2010
frying an egg v2.0
I tried to get this post up yesterday but my computer and camera were having a spat. Anyway here is what happened when I had another try at frying an egg..
I got up at 8:30am to try and start cooking but the sun was not high enough in the sky and so was being blocked by some trees.
It was the same story at 9am. I thought about trying the solar oven out the front of the house but we have builders working at the moment and they are busy sawing things out there and I wouldn't want anything flying over and into the oven, which isnt completely sealed from dust.
10am - Finally enough sun streaming directly down to the ground so have set up the oven. There is no wind blowing today which is good. The air is cool but the sun is hot.
15 mins in - No progress on egg (as expected) but the pan is heating up :)
30 mins in - Still no change. I have repositioned the oven to catch more sun. It doesn't feel like the oven is emitting any heat but the pan still feels nice and warm.
45 mins in - YAY! The egg is turning solid white :D More so than yesterday so hopefully it continues! The sun is streaming down strongly.
1 hour in - The egg is cooking solidly. Hooray! Now the egg white is much more solid.
1 hour 15 mins in - Egg is doing well! White is almost completely solid & cooked.
1 1/2 hours in - No change.
1 hour 45 mins in - Little to no change. I have moved the oven to get some more sun.
2 hours 15 mins in - Egg is cooked!! I am going to leave it out there for a while longer while the sun is still hitting hard as I prefer my eggs well cooked. But it could be served "sunny side up" as is :D There seems to be a film on it though.. Not sure how that will affect the egg. I will have a closer look when I go to eat it later.
A little while later and I am excited to get the egg out. It looks totally cooked! Woohoo!
Now it's time to eat the egg..
I got up at 8:30am to try and start cooking but the sun was not high enough in the sky and so was being blocked by some trees.
It was the same story at 9am. I thought about trying the solar oven out the front of the house but we have builders working at the moment and they are busy sawing things out there and I wouldn't want anything flying over and into the oven, which isnt completely sealed from dust.
10am - Finally enough sun streaming directly down to the ground so have set up the oven. There is no wind blowing today which is good. The air is cool but the sun is hot.
15 mins in - No progress on egg (as expected) but the pan is heating up :)
30 mins in - Still no change. I have repositioned the oven to catch more sun. It doesn't feel like the oven is emitting any heat but the pan still feels nice and warm.
45 mins in - YAY! The egg is turning solid white :D More so than yesterday so hopefully it continues! The sun is streaming down strongly.
1 hour in - The egg is cooking solidly. Hooray! Now the egg white is much more solid.
1 hour 15 mins in - Egg is doing well! White is almost completely solid & cooked.
1 1/2 hours in - No change.
1 hour 45 mins in - Little to no change. I have moved the oven to get some more sun.
2 hours 15 mins in - Egg is cooked!! I am going to leave it out there for a while longer while the sun is still hitting hard as I prefer my eggs well cooked. But it could be served "sunny side up" as is :D There seems to be a film on it though.. Not sure how that will affect the egg. I will have a closer look when I go to eat it later.
A little while later and I am excited to get the egg out. It looks totally cooked! Woohoo!
Now it's time to eat the egg..
Sunday, September 5, 2010
the first test - frying an egg
First up on my list of food experiments to test was to see if my solar oven could fry an egg. Here is what happened..
I put the egg in the oven at 11am. The sun was shining brightly up in the sky and a rough hot wind was blowing.
10 mins in - Condensation forming on plastic from heat absorbing.
15 mins in - Wind had pushed the reflector down. This could continue to be a problem.
25 mins in - I have added another support for the reflector. Hopefully this will help keep it upright. The sun feels really hot on my back, surely it can cook this egg?!
45 mins in - Lid knocked down again so have tried to increase stability of the supports with tape. Hopefully it works as the oven seems to have lost heat. I have repositioned the oven to find more sun.
1 hour in - I don't think the egg has cooked AT ALL. However the supports seem to be holding now which is good. I moved the oven again to get more sun. Hoping the next hour is more successful!
1 1/2 hours in - The egg looks like it might be starting to cook ever so slightly (i can see some solid white) but I'm not optimistic. I think the wind is cooling the oven down too much, it feels much colder now. I have repositioned the oven once again.
1 hour 45 mins in - I think I'm losing the sun from the backyard. I need to watch and see where it goes.. Not sure if this means I'll need to start cooking much earlier in future or if perhaps I should cook out the front of my house?
Tomorrow I will try and fry an egg again but I will start much earlier in the morning (assuming the weather permits) and hopefully get a better result!
I put the egg in the oven at 11am. The sun was shining brightly up in the sky and a rough hot wind was blowing.
10 mins in - Condensation forming on plastic from heat absorbing.
15 mins in - Wind had pushed the reflector down. This could continue to be a problem.
25 mins in - I have added another support for the reflector. Hopefully this will help keep it upright. The sun feels really hot on my back, surely it can cook this egg?!
45 mins in - Lid knocked down again so have tried to increase stability of the supports with tape. Hopefully it works as the oven seems to have lost heat. I have repositioned the oven to find more sun.
1 hour in - I don't think the egg has cooked AT ALL. However the supports seem to be holding now which is good. I moved the oven again to get more sun. Hoping the next hour is more successful!
1 1/2 hours in - The egg looks like it might be starting to cook ever so slightly (i can see some solid white) but I'm not optimistic. I think the wind is cooling the oven down too much, it feels much colder now. I have repositioned the oven once again.
1 hour 45 mins in - I think I'm losing the sun from the backyard. I need to watch and see where it goes.. Not sure if this means I'll need to start cooking much earlier in future or if perhaps I should cook out the front of my house?
looks much shadier now
2 hours in - No further progress has been made. A tree in my garden is blocking a fair bit of sun currently. The oven feels much cooler. Hopefully the sun will emerge from behind the tree soon.
stupid trees start blocking the sun after 12pm
2 1/2 hours in - Still no further progress made and definitely not enough sun. I think I am writing this one off as a failure but I'll try again tomorrow.
3 hours in - Sun is mostly gone from the backyard and there is only a small patch out the front. The egg remains predominantly uncooked.
Tomorrow I will try and fry an egg again but I will start much earlier in the morning (assuming the weather permits) and hopefully get a better result!
how to make a pizza box solar oven
What you'll need:
- a pizza box
- black construction paper
- aluminium foil
- clear plastic or plastic wrap
- non-toxic glue and tape
- wooden skewers
What to do:
Draw a 2.5cm border on all 4 sides of the top of the pizza box.
Cut along 3 sides leaving the line along the back of the box uncut.
Form a flap by gently folding back along the uncut line to form a crease.
Cut a piece of aluminium foil to fit on the inside of the flap. Smoothe out and wrinkles and tape into place.
Measure a piece of plastic to fit over the opening created by forming the flap. Be sure the plastic becomes a tightly sealed window so that the air cannot escape and tape firmly in place.
Cut another piece of aluminium foil to line the bottom of the box and glue into place.
Cover the foil with a piece of black construction paper and tape into place.
Close the pizza box top and prop open the reflective foil flap of the box with the wooden skewers.
And now your solar oven is ready to use!
Thanks to http://www.solarnow.org/pizzabx.htm for the instructions.
and so it begins
I am currently attempting my first experiment with the solar cooker. I think there is enough sun today that it just might work! However I am a bit worried about the mad wind that is blowing so I am keeping my fingers crossed.. As i type, I have an egg sitting out in my first solar oven (made from a pizza box - a blog post with pictures on how to make this will be up soon). Hopefully it will be fully fried in the next few hours so I can eat it later :)
The other thing I am worried about is my cookware. Graniteware is the best thing to use in solar ovens, and you want it to be dark. I was going to use an egg pan from home but even the shallowest one we have was touching the plastic top of the oven when it was closed. I had vision of the heated pan burning through the thin glad wrap so I have opted for a really shallow cake pan. Hopefully this absorbs the heat well enough!
So already I am seeing where this pizza box oven has it's shortcomings. I don't know that many cooking trays will fit in there either. Perhaps I can find a smaller one and buy it, but I'm not too sure what's out there. I really do want this oven to work though because it's smaller size makes it way more convenient to lug around than the other model I am building. I guess I just have to wait and see...
Subscribe to:
Posts (Atom)